cheesy bloggers choose .gifs
Yeah, OK: pheh upon the subject line -- and many of you have pronounced "gif" the way you would if it appeared in the word "gift", which is the way we go it in English rather than "JIF" so that the above pun actually makes sense, so enough about that.
I have Google Analytics installed on this blog just for my reference sake so that I can find out facts like this one: about 4% of the people coming here have come using search engines using the terms "transparent .gif" or some variation therein. So let's take 2 minutes and talk about .gifs, transparency, and using them on a web page.
It's a no-brainer to build a .gif file with transparency using the GiMP. (see: "GiMP", not "JIMP"; thus "GIF", not "JIF" -- "G" before "I" equals "G", not "J"). You saw an image in this geek-speak article which is GiMP-made, and also has the benefit of a transparent background.
Here's the original:

Here it is opened with the GiMP, blown up to 4 times its size so you can see pixel-level detail:
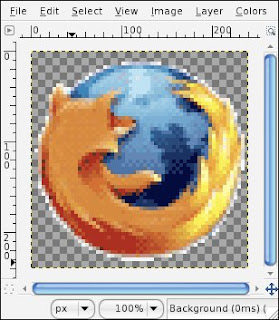
Notice something about the blow-up: there's a very faint border of white and nearly-white pixels around the edge of the image. And as long as the image is on a white or nearly-white background, it'll look fine. But watch this:
On a dark background, the border makes a very jaggy appearance. In fact, you see this problem all over the place on home-job web sites all over the internet. DON'T LET THIS HAPPEN TO YOU.
The key, it turns out, is making the border jaggies in the first place. That sounds crazy, but hear me out. What those border pixels are really doing is allowing the colors they surround to naturally fade into an edge line without distortions or jaggies, which the geeks call "anti-alias".
Yeah, well, they're geeks not poets, so cut them some slack. And before the geeks and statitsicians jump on me, I realize that's a pretty, um, imprecise paraphrase. We're talking about .gifs here, not the signal in the spatial optical domain.
So when I adapted this image from the Firefox web site, I made a decision that I was going to use it on a nearly-white background image. To maintain the illusion of layers without causing my real colors to go jaggy, I pasted the original image on a white background, flattened it out, and reselected the image. Then using my "Select" menu and a very patient approach, I selected the image in a way which allowed a simple border about one pixel wide to surround the basic image. I then cut the selection from the original sandbox image and pasted it into a new sandbox with a transparent background.
I know: "how about some sample images to guide us, cent?" I am in a little bit of a hurry here, so I'll try to add guide images later. Today you'll have to read to learn -- a lost art, I am sure, but you're smart and tough.
Lucky for you, however, that's it. Save the file as "name.gif", click "OK" a couple of times, and the file you will have saved will have a transparent outer field that will enable you to lay it on top of objects in the background of your web page.
We can talk about file size, color depth, and animation some other time.
