Handling the basic tools
OK – I sorta left you hanging in the last entry with your puny 200x200 workspace, but I figured you had enough information there to at least get yourself into only a little bit of trouble. I also wanted to switch platforms so that I wasn't only vexing the WIN users, but I'll be honest enough to admit that I will persistently vex the UNIX/LINUX and other users as I don’t have a place to work the GiMP from those environments. The stuff you see today will be harvested from an older Windows box running XP Professional using the "silver" appearance scheme.

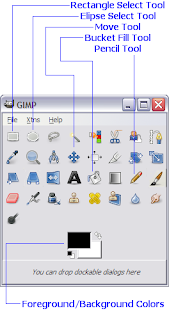
And this box has an extra-big screen, but as you can see, I have the GiMP configured as we left you last time, which is with the simply tool bar and the "Tool Options" dialog. This lesson, we're going to try out the 7 most basic tools on the pallet, all of which you will recognize from your rudimentary paint program. However, I hope that you will find these 6 tools slightly more robust than what you find in grubby ol' MS Paint.
"But Cent," you are saying, "You have only labeled 6 tools. You said 7 tools."
Patience, young GiMPster. Patience.
The first tool we'll take a look at is the one at the bottom of the pallet, which is the foreground/background (FG/BG) tool. It seems a little much to call this an actual "tool", but it is actually the most basic and useful tool on the pallet as it actually effects all the other tools in a significant way.
First, in case you have been working ahead, click the little black-over-white widget at the bottom of the FG/BG tool. This reverts the tool to its default status, which is black foreground and white background.

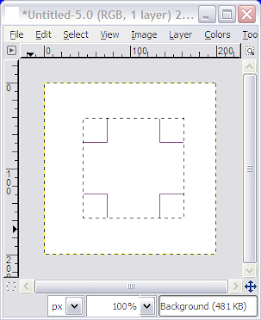
See? Very tricky, I am sure. Now select your Rectangle Select tool, and use it to select a roughly-square section in the middle of your 200x200 sandbox image, thus:
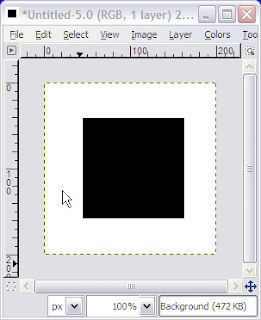
Now, if you "cut" that square in the current state of the tool set, it will look like nothing happened – because you have the background set to "white", and the image itself is set to white, right? But if you click the swap arrows and put black in the background and "cut" the selection (you could use CTRL-X, or drop down the Edit menu – I imagine you know those really ubiquitous commands), you get a black square in the middle of your image, thus:
Now, look at that: you have just grasped the basics of two simple tools! I know – you could have prolly gotten that on your own, but I wanted to show you that you're not really that lost with this robust tool: you really do have enough essential knowledge to not be intimidated by what the GiMP can do.
Now reset the FG/BG tool, select the Elipse Select Tool, and make your sandbox image look like this:
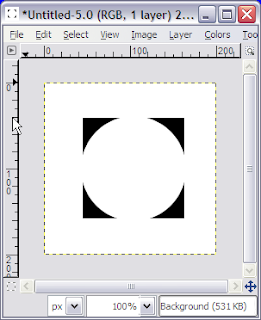
Right? That's not a problem, and anyone can do that – even with MS Paint.
Yes, you're very smart. But now we're going to unleash the elusive tool #7 to show you why you should use something this robust rather than the box of 8 crayons known as "MS Paint".
Look at the menu selections in your sandbox image, and notice the "Dialogs" menu – the one which you used to turn on the Tool Options dialog.
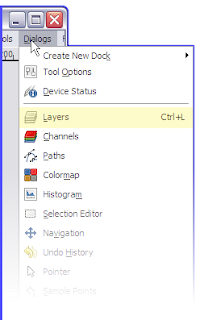
Notice the option "Layers". (All the Photoshop people now went "ahhhhhhh", as if they just got a glass of cold lemonade on a hot day) Select that, and take a look at what it says about your sandbox image.
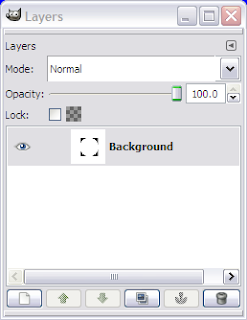
I'm not going to overwhelm you with the power of this tool today, but I am going to show you how to use it in a rudimentary way. Notice in the bottom-left corner it has a button that looks like a grayed-out document. If you hold your mouse over that button, it says "Create a new layer and add it to image". Go ahead and click it, and you'll get this dialog:
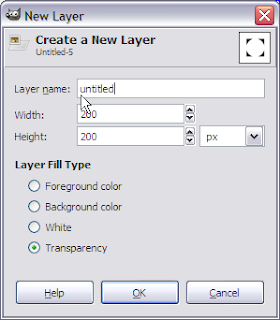
Go ahead and rename the New Layer "circle", and make sure the "Transparency" radio button is selected. Then click "OK". Your Layers dialog box will now look like this:
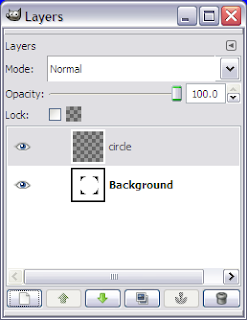
Now, so what? Seriously: the image didn’t change one bit by looking at it, right? Well, that's actually the point, dude. What you have done is added a virtual piece of transparent plastic over the picture you are working on, and it will allow you to do all kinds of weird stuff to your image without destroying it.
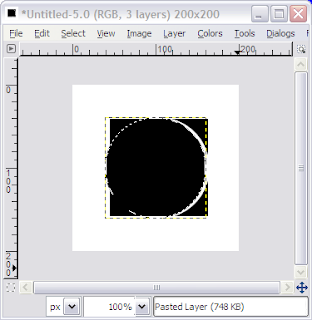
For example, go ahead and paste your clipboard into the image now. Your sandbox will look like this:
and your layers dialog will look like this:
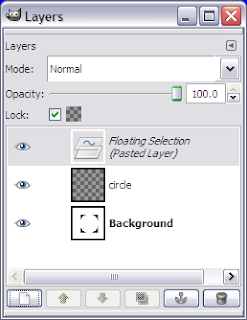
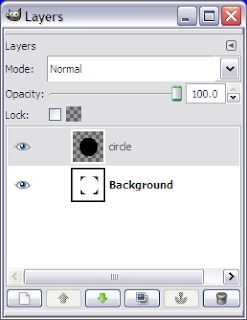
Which, again, not very exciting even after you hit the little button with the anchor on it to put the clipboard solidly in the circle layer:
In fact, it looks like you did a lousy job of trying to put the circle you cut back into the hole you made, right? I mean, unless you're an android or something and you cut the circle from the exact center of the sandbox image, it's not pasted in the center.
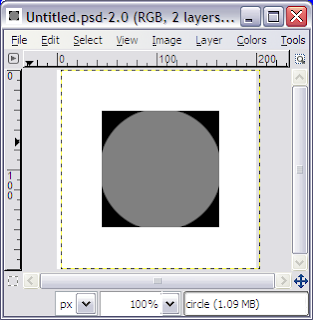
Well, let's use the Move tool to actually move it to where it belongs. Select the move tool, then in the layers dialog select the "circle" layer. Now move to the sandbox image and drag the circle so it lines up perfectly, like this:
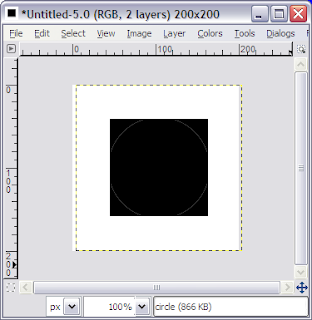
Now, the more observant amongst you are wondering what the dotted lines are in that image. Those likes are the actual edges of this layer for your reference, which won’t matter to you for a little while, but just remember that you can see the edges of your layers when you select the layer.
But again, you may be thinking, "yes, but so what? Why put things in layers when in fact I can just select them and paste them in Paint and get more or less the same effect?"
You see: there you are trapped in the limits of your own experience. Take a look at the Layers dialog for a second, and make sure the "circle" layer is selected. Now check the "opacity" slider. "Opacity" is a characteristic of a layer which is sort of the opposite of "transparency". 100% "opacity" equals 0% "transparency", thus our pasted layer is like a black tar dot over the rest of the image.
Now check this out:
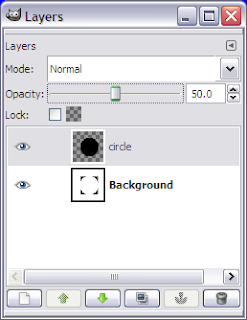
I have adjusted the layer opacity to 50% (you can slide the slider, or you can highlight the value and type in a new one), and what I get is this:
Again, not very impressive in and of itself, but you do the same thing, then use the Move tool to move it around your sandbox to see how the image behind the layer shows through.
OK – fast count says that there is more than 4 pages of instruction here, and we have only covered 4 of the 7 tools. Select the Bucket Fill tool, and let's bust a move. Now, to see how really impressive GiMP is, go to the FG/BG tool, and double-click on the black FG color. You'll get this:

Now, your color picker tool will not be filled up along the bottom with all the colors my version of the GiMP is because you haven't picked or built a lot of custom colors, but look: highlight the text in the "HTML notation" field, and type "ff0000" where the "0" are ZEROS not "o"s. That should change you "Current" color to a very bright red, at which time you should click "OK".
Notice that your FG color is now red. In the "Layers" dialog, select the "circle" layer, and move your Bucket fill tool over the circle in your sandbox image. Click someplace on the gray area, and you get this:
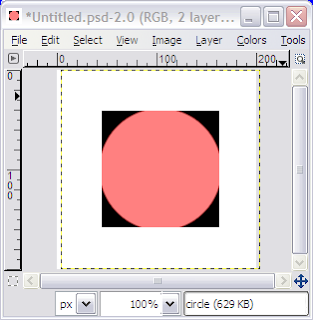
Your circle stays in tact, it's opacity stays in tact, but its base color changes from black to red. Now, this doesn't really look that astonishing in our simple example, but keep in mind that we're just test-driving the tools for future use.
Last tool: pencil tool. Like you don't know how to use the pencil tool, right? Heh. You kids. Select the pencil tool, then look at the "Tool Options" dialog. You should have something like this:
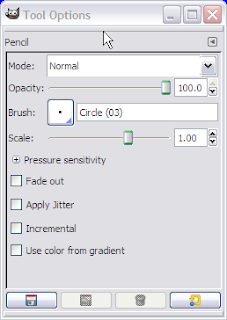
Notice the "Brush" button, which, if you click, will pop open a menu like this:
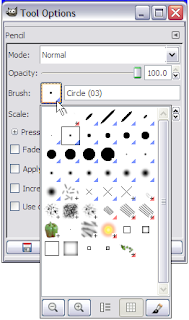
That submenu lists all the brush styles available for the pencil tool, so you are not stuck with just a square block point to try to draw what you want to draw.
And believe it or not, that's not the best way to draw complex objects in GiMP, but we have just rolled over page 5 in WORD, so you must be full. I can promise you I am on empty right now.
Use what you know, and I'll be back later to give you some more.

And this box has an extra-big screen, but as you can see, I have the GiMP configured as we left you last time, which is with the simply tool bar and the "Tool Options" dialog. This lesson, we're going to try out the 7 most basic tools on the pallet, all of which you will recognize from your rudimentary paint program. However, I hope that you will find these 6 tools slightly more robust than what you find in grubby ol' MS Paint.

"But Cent," you are saying, "You have only labeled 6 tools. You said 7 tools."
Patience, young GiMPster. Patience.
The first tool we'll take a look at is the one at the bottom of the pallet, which is the foreground/background (FG/BG) tool. It seems a little much to call this an actual "tool", but it is actually the most basic and useful tool on the pallet as it actually effects all the other tools in a significant way.
First, in case you have been working ahead, click the little black-over-white widget at the bottom of the FG/BG tool. This reverts the tool to its default status, which is black foreground and white background.

See? Very tricky, I am sure. Now select your Rectangle Select tool, and use it to select a roughly-square section in the middle of your 200x200 sandbox image, thus:

Now, if you "cut" that square in the current state of the tool set, it will look like nothing happened – because you have the background set to "white", and the image itself is set to white, right? But if you click the swap arrows and put black in the background and "cut" the selection (you could use CTRL-X, or drop down the Edit menu – I imagine you know those really ubiquitous commands), you get a black square in the middle of your image, thus:

Now, look at that: you have just grasped the basics of two simple tools! I know – you could have prolly gotten that on your own, but I wanted to show you that you're not really that lost with this robust tool: you really do have enough essential knowledge to not be intimidated by what the GiMP can do.
Now reset the FG/BG tool, select the Elipse Select Tool, and make your sandbox image look like this:

Right? That's not a problem, and anyone can do that – even with MS Paint.
Yes, you're very smart. But now we're going to unleash the elusive tool #7 to show you why you should use something this robust rather than the box of 8 crayons known as "MS Paint".
Look at the menu selections in your sandbox image, and notice the "Dialogs" menu – the one which you used to turn on the Tool Options dialog.

Notice the option "Layers". (All the Photoshop people now went "ahhhhhhh", as if they just got a glass of cold lemonade on a hot day) Select that, and take a look at what it says about your sandbox image.

I'm not going to overwhelm you with the power of this tool today, but I am going to show you how to use it in a rudimentary way. Notice in the bottom-left corner it has a button that looks like a grayed-out document. If you hold your mouse over that button, it says "Create a new layer and add it to image". Go ahead and click it, and you'll get this dialog:

Go ahead and rename the New Layer "circle", and make sure the "Transparency" radio button is selected. Then click "OK". Your Layers dialog box will now look like this:

Now, so what? Seriously: the image didn’t change one bit by looking at it, right? Well, that's actually the point, dude. What you have done is added a virtual piece of transparent plastic over the picture you are working on, and it will allow you to do all kinds of weird stuff to your image without destroying it.
For example, go ahead and paste your clipboard into the image now. Your sandbox will look like this:

and your layers dialog will look like this:

Which, again, not very exciting even after you hit the little button with the anchor on it to put the clipboard solidly in the circle layer:

In fact, it looks like you did a lousy job of trying to put the circle you cut back into the hole you made, right? I mean, unless you're an android or something and you cut the circle from the exact center of the sandbox image, it's not pasted in the center.
Well, let's use the Move tool to actually move it to where it belongs. Select the move tool, then in the layers dialog select the "circle" layer. Now move to the sandbox image and drag the circle so it lines up perfectly, like this:

Now, the more observant amongst you are wondering what the dotted lines are in that image. Those likes are the actual edges of this layer for your reference, which won’t matter to you for a little while, but just remember that you can see the edges of your layers when you select the layer.
But again, you may be thinking, "yes, but so what? Why put things in layers when in fact I can just select them and paste them in Paint and get more or less the same effect?"
You see: there you are trapped in the limits of your own experience. Take a look at the Layers dialog for a second, and make sure the "circle" layer is selected. Now check the "opacity" slider. "Opacity" is a characteristic of a layer which is sort of the opposite of "transparency". 100% "opacity" equals 0% "transparency", thus our pasted layer is like a black tar dot over the rest of the image.
Now check this out:

I have adjusted the layer opacity to 50% (you can slide the slider, or you can highlight the value and type in a new one), and what I get is this:

Again, not very impressive in and of itself, but you do the same thing, then use the Move tool to move it around your sandbox to see how the image behind the layer shows through.
OK – fast count says that there is more than 4 pages of instruction here, and we have only covered 4 of the 7 tools. Select the Bucket Fill tool, and let's bust a move. Now, to see how really impressive GiMP is, go to the FG/BG tool, and double-click on the black FG color. You'll get this:

Now, your color picker tool will not be filled up along the bottom with all the colors my version of the GiMP is because you haven't picked or built a lot of custom colors, but look: highlight the text in the "HTML notation" field, and type "ff0000" where the "0" are ZEROS not "o"s. That should change you "Current" color to a very bright red, at which time you should click "OK".
Notice that your FG color is now red. In the "Layers" dialog, select the "circle" layer, and move your Bucket fill tool over the circle in your sandbox image. Click someplace on the gray area, and you get this:

Your circle stays in tact, it's opacity stays in tact, but its base color changes from black to red. Now, this doesn't really look that astonishing in our simple example, but keep in mind that we're just test-driving the tools for future use.
Last tool: pencil tool. Like you don't know how to use the pencil tool, right? Heh. You kids. Select the pencil tool, then look at the "Tool Options" dialog. You should have something like this:

Notice the "Brush" button, which, if you click, will pop open a menu like this:

That submenu lists all the brush styles available for the pencil tool, so you are not stuck with just a square block point to try to draw what you want to draw.
And believe it or not, that's not the best way to draw complex objects in GiMP, but we have just rolled over page 5 in WORD, so you must be full. I can promise you I am on empty right now.
Use what you know, and I'll be back later to give you some more.
