File types and the GiMP
With the scrappy little bit of knowledge you now have about the GiMP, my guess is that you're poking around and making some images, or editing images that you have been wanting to fiddle with, and you want to be able to SAVE YOUR WORK.
You know: because if you SAVE YOUR WORK, you don't have to START ALL OVER AGAIN if your power fails or you fall asleep while playing with your new, free toy here.
But when you try to SAVE YOU WORK, the GiMP saves it as something called a .xcf file -- and your web browser can't open that now, can it?
So, first rule about saving with the GiMP is this: when you go to save, select the file type by selecting the correct file-type extensions -- that is, the right 3-letter suffix that comes after the ubiquitous "dot" in all normal web file names. If you omit it, the GiMP will substitute ".xcf", which ultimately means "GiMP-native file format".
The good news with .xcf is that it preserves all your resolution and layers for future use, and the bad news is that it only opens with the GiMP. What you need to do is save your work in a web-ready format, and we're going to talk about the 2 major file types which are used all over the web today -- because each has its own upside and downside.
{BTW, all the images in this tutorial are downloaded from stock.xchng which is a royalty-free source of photos and images, so thanks to them for their support of better web images for everyone}
The two most-common file formats on the web today are ".jpg" (or "j-peg") and ".gif" (or "GIF"). JPG format is a variable-definition format in which the user determines the ultimate quality of the image by selecting a % of compression upon saving. Higher compression means smaller file-type, but it also means poorer quality. Consider this image:
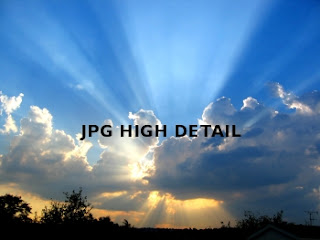
As an original, this image was saved as a JPG at 100% quality, meaning little or no compression. Now consider this one:
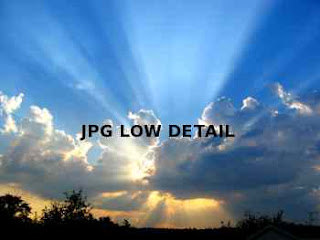
Same base image, but it was saved at 33% quality, so the file size is much smaller, but the quality also comes way down. Notice in that image how there is "noise" around the high-contrast areas of the image, like at the edge of the letters. This is due to the type of compression used in a JPG. However, if you can live with a little noise, the second image is only 16K while the first is over 130K. There is probably a compression setting between the two extremes which you can use to reduce the noise but keep your file size down to a something which doesn't drive the few phone-moden users left on the net completely insane.
Since the JPG format is about as old as computing, it has evolved over time, and its younger cousin is the .png format. There are some real benefits to PNG, but for today let's just say that PNG is for times when higher quality is prefered but file size is not much of a consideration.
The other "web-ready" file format we're going to chat about today is the GIF format, which you can see below:
GIF files use something called "indexed color" to help reduce file size. A color index is essentially a chart or map of the strict colors used in an image, and the receiving platform simply uses that color map (usually embedded in the file) to render each pixel. This first image actually uses only 64 colors to render the picture, and it actually looks pretty good by itself. However, if you compare it to the "JPG HIGH DETAIL" image, you can see specific graininess in the clouds and in the lit sky where there are gradients of color moving from light to dark. That graininess is called "dither", and to some degree you can control it by selecting the method of dither when you convert your image to indexed color.
You can see the further effects of dither in this next image, which is saved down to a 32-color index:
I know what you're thinking: maybe what I want is no dither to eliminate the graininess. that seems like a good idea in theory, but when you actually render a no-dither, you get something like this:
You get something which looks far less realistic, though perhaps there are some applications for this kind of rendering when you want a more impressionistic effect.
For now, just remember that to save as any file type, you simply have to change the file type extension of your file in the "Save As ..." dialog box, and the GiMP will drive the file conversion.
Next time we'll talk more about how to manage your color in images more effectively than simply letting the GIMP create bad choices for you.
You know: because if you SAVE YOUR WORK, you don't have to START ALL OVER AGAIN if your power fails or you fall asleep while playing with your new, free toy here.
But when you try to SAVE YOU WORK, the GiMP saves it as something called a .xcf file -- and your web browser can't open that now, can it?
So, first rule about saving with the GiMP is this: when you go to save, select the file type by selecting the correct file-type extensions -- that is, the right 3-letter suffix that comes after the ubiquitous "dot" in all normal web file names. If you omit it, the GiMP will substitute ".xcf", which ultimately means "GiMP-native file format".
The good news with .xcf is that it preserves all your resolution and layers for future use, and the bad news is that it only opens with the GiMP. What you need to do is save your work in a web-ready format, and we're going to talk about the 2 major file types which are used all over the web today -- because each has its own upside and downside.
{BTW, all the images in this tutorial are downloaded from stock.xchng which is a royalty-free source of photos and images, so thanks to them for their support of better web images for everyone}
The two most-common file formats on the web today are ".jpg" (or "j-peg") and ".gif" (or "GIF"). JPG format is a variable-definition format in which the user determines the ultimate quality of the image by selecting a % of compression upon saving. Higher compression means smaller file-type, but it also means poorer quality. Consider this image:

As an original, this image was saved as a JPG at 100% quality, meaning little or no compression. Now consider this one:

Same base image, but it was saved at 33% quality, so the file size is much smaller, but the quality also comes way down. Notice in that image how there is "noise" around the high-contrast areas of the image, like at the edge of the letters. This is due to the type of compression used in a JPG. However, if you can live with a little noise, the second image is only 16K while the first is over 130K. There is probably a compression setting between the two extremes which you can use to reduce the noise but keep your file size down to a something which doesn't drive the few phone-moden users left on the net completely insane.
Since the JPG format is about as old as computing, it has evolved over time, and its younger cousin is the .png format. There are some real benefits to PNG, but for today let's just say that PNG is for times when higher quality is prefered but file size is not much of a consideration.
The other "web-ready" file format we're going to chat about today is the GIF format, which you can see below:

GIF files use something called "indexed color" to help reduce file size. A color index is essentially a chart or map of the strict colors used in an image, and the receiving platform simply uses that color map (usually embedded in the file) to render each pixel. This first image actually uses only 64 colors to render the picture, and it actually looks pretty good by itself. However, if you compare it to the "JPG HIGH DETAIL" image, you can see specific graininess in the clouds and in the lit sky where there are gradients of color moving from light to dark. That graininess is called "dither", and to some degree you can control it by selecting the method of dither when you convert your image to indexed color.
You can see the further effects of dither in this next image, which is saved down to a 32-color index:

I know what you're thinking: maybe what I want is no dither to eliminate the graininess. that seems like a good idea in theory, but when you actually render a no-dither, you get something like this:

You get something which looks far less realistic, though perhaps there are some applications for this kind of rendering when you want a more impressionistic effect.
For now, just remember that to save as any file type, you simply have to change the file type extension of your file in the "Save As ..." dialog box, and the GiMP will drive the file conversion.
Next time we'll talk more about how to manage your color in images more effectively than simply letting the GIMP create bad choices for you.
